What is XPath used for?
XPath (XML Path Language) is a language that makes it easier to navigate through DOM elements by generating content in XML, which is eXtensible Markup Language.
Where xpath is used? XPath is used to create expression paths based on DOM document nodes. The path created resembles the one we often see when creating some file.
The great thing about XPath is the wide collection of supported languages, which include Java, JavaScript, and Python, and others.
Preliminary
Can xpath be used on html? The Document Object Model (DOM) tree allows you to manipulate HTML in a variety of ways. It consists of HTML tags and attributes such as <html>, <p id="text">, <h1> and <input id="display_name" class="input_message" type="text" name="display_name">. An HTML document has a hierarchical structure, so page elements have their children and parents. The parents are the superordinate elements, while the children are the subordinate elements. With this approach, the DOM tree hierarchy can be compared to a family tree. HTML tags are DOM nodes and are used to create valuable XPath paths. Before we get to that, however, let's recap a little theory...
What are locators?
What are xpath functions in selenium? Each HTML element is a representation of web elements, belonging to the WebElement Interface (Selenium), from which locators are created. The driver we use identifies web elements. And thanks to Selenium, we can recognize elements on the page. The methods of finding locators include:
- id,
- name,
- XPath,
- LinkText,
- PartialLinkText,
- tag name,
- class name,
- CSS Selector.
But where to look for them? And how to find them?
Well, there is no need to look for anything complicated, because we can find everything on the website. All you need to do is to right-click on the appropriate element and select "Examine Element." Then the browser will move us in the structure of the page to the specific element.
Example 1.
All examples are based on the page prepared by the creators of Selenium framework: http://automationpractice.com/index.php.
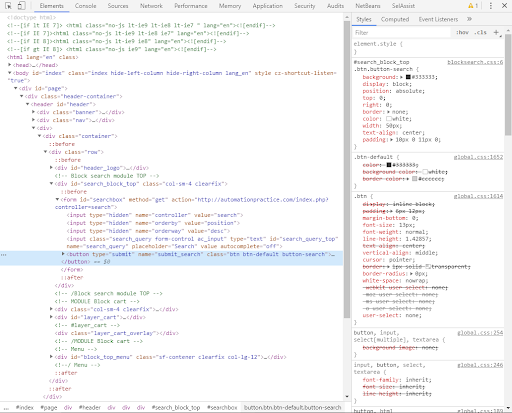
Let's find the search button in the HTML structure by right-clicking on this element and selecting the "Examine" option.
Next, we are taken to the developer view, the so-called "Developer tools." The item we are looking for is marked in blue.
What makes a locator good?
But how do you know which information to pay attention to when creating a locator?
The locator should be:
- unique, meaning it should point to a specific element,
- short – this applies mainly to CSS and XPath - each consecutive element in the expression is a potential factor that can be changed by the developer, so it is safer to create short selectors that are not likely to change,
- simple - as uncomplicated and as easy to understand as possible for us and the rest of the team,
- descriptive and unambiguous - CSS Selector and XPath - we have no problem identifying the web element on the page.
The most recommended are locators composed of:
- id,
- name,
- Class name,
- Xpath/CSS.
So, we start looking for a locator by verifying whether it has an id attribute. When the element does not have it, we check the attribute name. When it does not contain these elements, we direct our attention to the Class name. If the web element has a unique class, it is great - we are happy and can use it. However, when the class refers to at least two elements, we have two options - either create a CSS Selector or Xpath.
Why is it not recommended to use the other methods?
Because LinkText or PartialLinkText can be changed at any time along with the page content, and they do not support testing different language versions of a web application.
Xpath can be replaces by CSS selector?
The dependency of the locator selection strategy is based on the context of what we want to do. Most often XPath is used when we have a difficult web element with a long path and when we support older browsers. CSS is preferred when we support modern browsers and don't need to assemble complex selectors.
The important difference between both methods is that XPath expressions allow you to search backward or forward in the structure of your page, while CSS enables you to operate only forwards.
How Xpath works?
Relative and absolute selection of elements
XPath can be divided according to the locator-based path created into:
- Absolute Xpath, which is a direct path to the element we are looking for, stored "hard." These are highly susceptible to changes in the HTML structure.
- Relative Xpath, which has only elements needed to identify the searched element, these are called coordinates. Usually it occurs as a modification of the pattern:
//name_tag[@atrybut='value'].
Example 2.
Let's compare both groups of XPath locators to each other. The paths shown are directed to the same element - the field used to enter an email when registering a newsletter subscription.
- Absolute.
/html/body/div/div/footer/div/div/div/form/div/input[@id='newsletter-input'] - Relative.
//input[@id='newsletter-input']
You can see a definite difference in the construction of the locators. The first one will become obsolete after a minimal change in the page structure hierarchy. It is incomprehensible and difficult to explain. The second one, on the other hand, is simple, short, and specific. It contains the most important information about the item you are looking for, only the necessary information. Thanks to this, when the developers change the structure of the page the path will still be valid. Moreover, it is clear so you can immediately see which web element you are searching for.
Xpath contains text
The most important elements of XPath language syntax are listed in the table below.
| Elements of XPath syntax | Element description |
|---|---|
| / | Selects from the root node of DOM, relative path |
| // | Selects nodes in the document from the current node that match the selection no matter where they are, absolute path |
| . | Selects the current node |
| .. | Selects the parent of the current node |
| @ | Indicates an attribute |
| * | Matches any element node that can be found |
And that's all I need to know? Yes, you can create most of the XPath-based locators based on the expressions mentioned above, but you should know that the possibilities of this language don't end there. Well, those are just the basics. I invite you to read a series of articles at W3C.
I will come back to some more interesting possibilities of XPath, but first, let's discuss an example to put the gained knowledge into practice.
Selecting an element with the same tag
Example 3.
Let's find the XPath for the element "Sign In". Let's examine where it is located in the structure of the HTML document. Right-click on the element and select "Examine." The found web element is highlighted in blue.
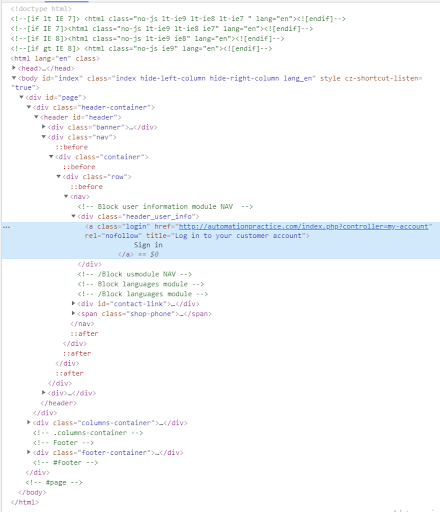
The selected example has only the "login" class, which is used only once for now. The Chrome browser provides automatic XPath preparation, so let's right-click on the selected element and select "Copy." The ways to copy the path to the indicated element will appear. Let's use the "Copy full XPath" option.
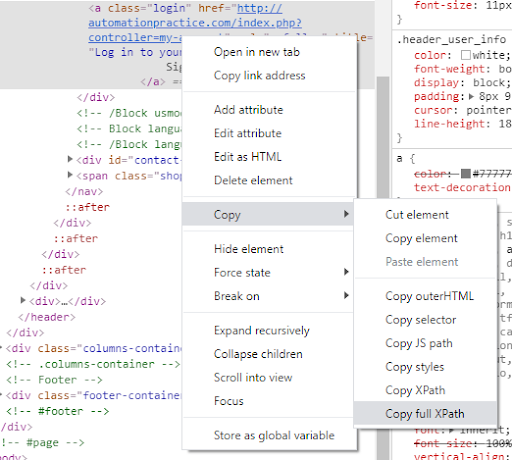
As a result, we get:
/html/body/div/div[1]/header/div[2]/div/div/nav/div[1]/a
However, we see that this locator is too long, and the moment the developer changes something in the page structure - it will stop working. And what happens when we choose the "Copy XPath" option?
//*[@id="header"]/div[2]/div/div/nav/div[1]/a
This locator doesn't look very good either. Let's try to make our own. So where do we start? Let's take another look at our element.
<a class="login” href="http://automationpractice.com/index.php?controller=my-account" rel="nofollow" title="Log in to your customer account">Sign in</a>
What can we use to create a locator?
We have the <a> tag, class class='login' and text. Let's skip the text because it can change.
We start by creating a relative path - use // for this. As another element let's use a hyperlink tag with the class name.
//a[@class='login']
The locator looks much better. It is readable and short. When changes are introduced, it is much more likely to stay the same. Now let's check if we have created the path properly. To do this, in the developer tools, let's click anywhere in the HTML code. This way, after using the familiar "Ctr+F", we will see a new search window.
So let's check if our locator is performing its function.
Immediately after typing the locator, it finds our element in the structure of the HTML document. What if the class is reused?
We can add an element number, just like we number elements in a list. If we want to find a certain element with the li tag, which is in the 5th place in the DOM tree, we can use, for example, //li[5]. Let's check if such an element will be found.
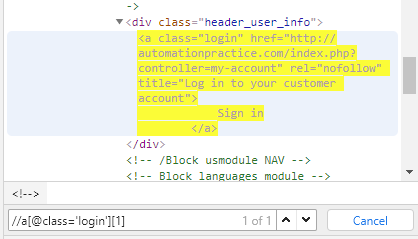
Yes! However, remember that we start the ordinal number from 1. Thanks to such use, we get the last added element. It simplifies sorting, increases the efficiency and stability of the page.
What else might be useful?
Contains()
What if a tag has more than one class? The Contains() function is the solution that allows us to find an element by comparing the partial content of its attribute. But it has different syntax //markname[contains(@attribute_name, 'fragment_class')].
Example 4.
On our test page, we have a list that appears in the DOM as
<ul class="sf-menu clearfix menu-content">
To create a locator for this list using Contains(), simply write
//ul[contains(@class,'menu-content')]
We check if the newly created locator was found. Again, we paste the path into the search engine and get the following result.

Conditions in XPath
To create locators using XPath, we can also use the conditions "AND" and "OR." When using "AND," it is important that all conditions must be met. When it comes to "OR" at least one condition must be valid.
Example 5.
Let's go to the login tab by clicking on "Sign in." Now, let's create a condition based on the email address and password. The full paths of the elements are shown below.
Email - full XPath:
/html/body/div/div[2]/div/div[3]/div/div/div[2]/form/div/div[1]/input
Email element in HTML:
<input class="is_required validate account_input form-control" data-validate="isEmail" type="text" id="email" name="email" value="">
Password - full XPath:
/html/body/div/div[2]/div/div[3]/div/div/div[2]/form/div/div[2]/span/input
HTML password element:
<input class="is_required validate account_input form-control" type="password" data-validate="isPasswd" id="passwd" name="passwd" value="">
Now let's combine both web elements with a single condition or, getting
//input[@name='email' or @name='passwd']
This will get one element selected even though we have indicated two valid ones. As a result, we get more web elements that satisfy the condition.
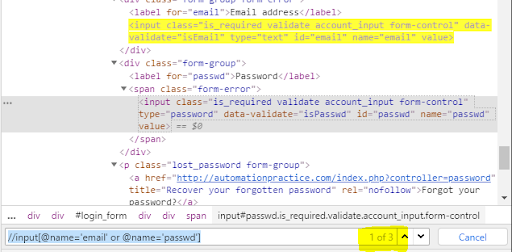
In the case of the and condition, we combine the name attribute belonging to the password with its type. As a result, we get only those results whose locator satisfies the indicated conditions.
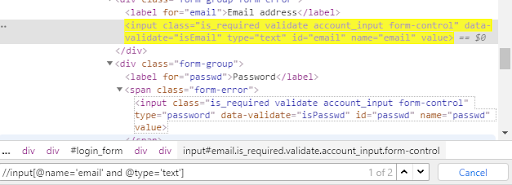
As we can see, the elements meeting the condition were identified. The search engine found two of them in the HTML code, which means the checked condition should be modified so that it points to one web element.
It is important to remember that each web element should be considered individually when selecting a locator. Web driver support for XPath is also necessary. Unfortunately, it is not supported up to IE9. Selenium tries to make up for it, but with great deficiencies. Other web drivers support XPath, so I encourage you to test them. It's worth remembering that creating a locator based on XPath is the last resort. Before that, you should check if there is no possibility to refer to the element by id, class, name, or CSS Selector.


